Introduction
1. Introduction
AFS MyCoder is an AI-assisted development tool that integrates with Coding LLM to provide developers with real-time programming assistance, including editing or generating code, interpreting code, generating annotations, debugging, and unit testing, and supporting popular programming languages such as Python, C, Java, PHP, TypeScript (JavaScript), C#, and Bash. This README will cover everything you need to know about using the VSCode extension and getting started for the first time.
AFS MyCoder enables developers to create, share, and use custom AI code assistants with VS Code
- Chat to understand and iterate on code in the sidebar
- Autocomplete to receive inline code suggestions as you type
- Edit to modify code without leaving your current file
- Agent to make more substantial changes to your codebase
1.1 Table of Contents
Click on the following table of contents to easily jump sections.
- Introduction
- Getting Started: Roles & Setup Overview
- Setup Guide
- How to Identify Issues
- Creating an Issue Report
- Contact Information
2. Getting Started: Roles & Setup Overview
2.1 Understanding Roles
AFS MyCoder has two distinct user roles with different responsibilities. Decide which one you are before you continue:
| Role | Who They Are | Responsibilities | Access Required |
|---|---|---|---|
| Project Administrator | Team leaders, project owners | • Configure project models Manage team members | • Web platform access • VSCode extension |
| Project User | Developers, team members | • Login and authenticate • Add repositories • Use coding assistance features • Generate/analyze code | • Limited web platform access • VSCode extension |
Scenarios: To help you better understand what role you may fall under, we have provided a scenario to refer to.
-
If you are a "Project Administrator":
Scenario: You are the tech lead for "Project Phoenix" and need to onboard your team of 5 developers to AFS MyCoder. Your job is to create the project, configure the AI models for everyone, and add your team members. After that, you will also need to generate your own API key to use the extension in VSCode, just like any other user.
-
If you are a "Project User":
Scenario: You are a developer on "Project Phoenix." Your team lead has already set up the project on AFS MyCoder and added you as a member. Your job is to install the VSCode extension and log in to authenticate, which will automatically configure your access to start coding with AI.
2.2 Overall Setup Process Overview
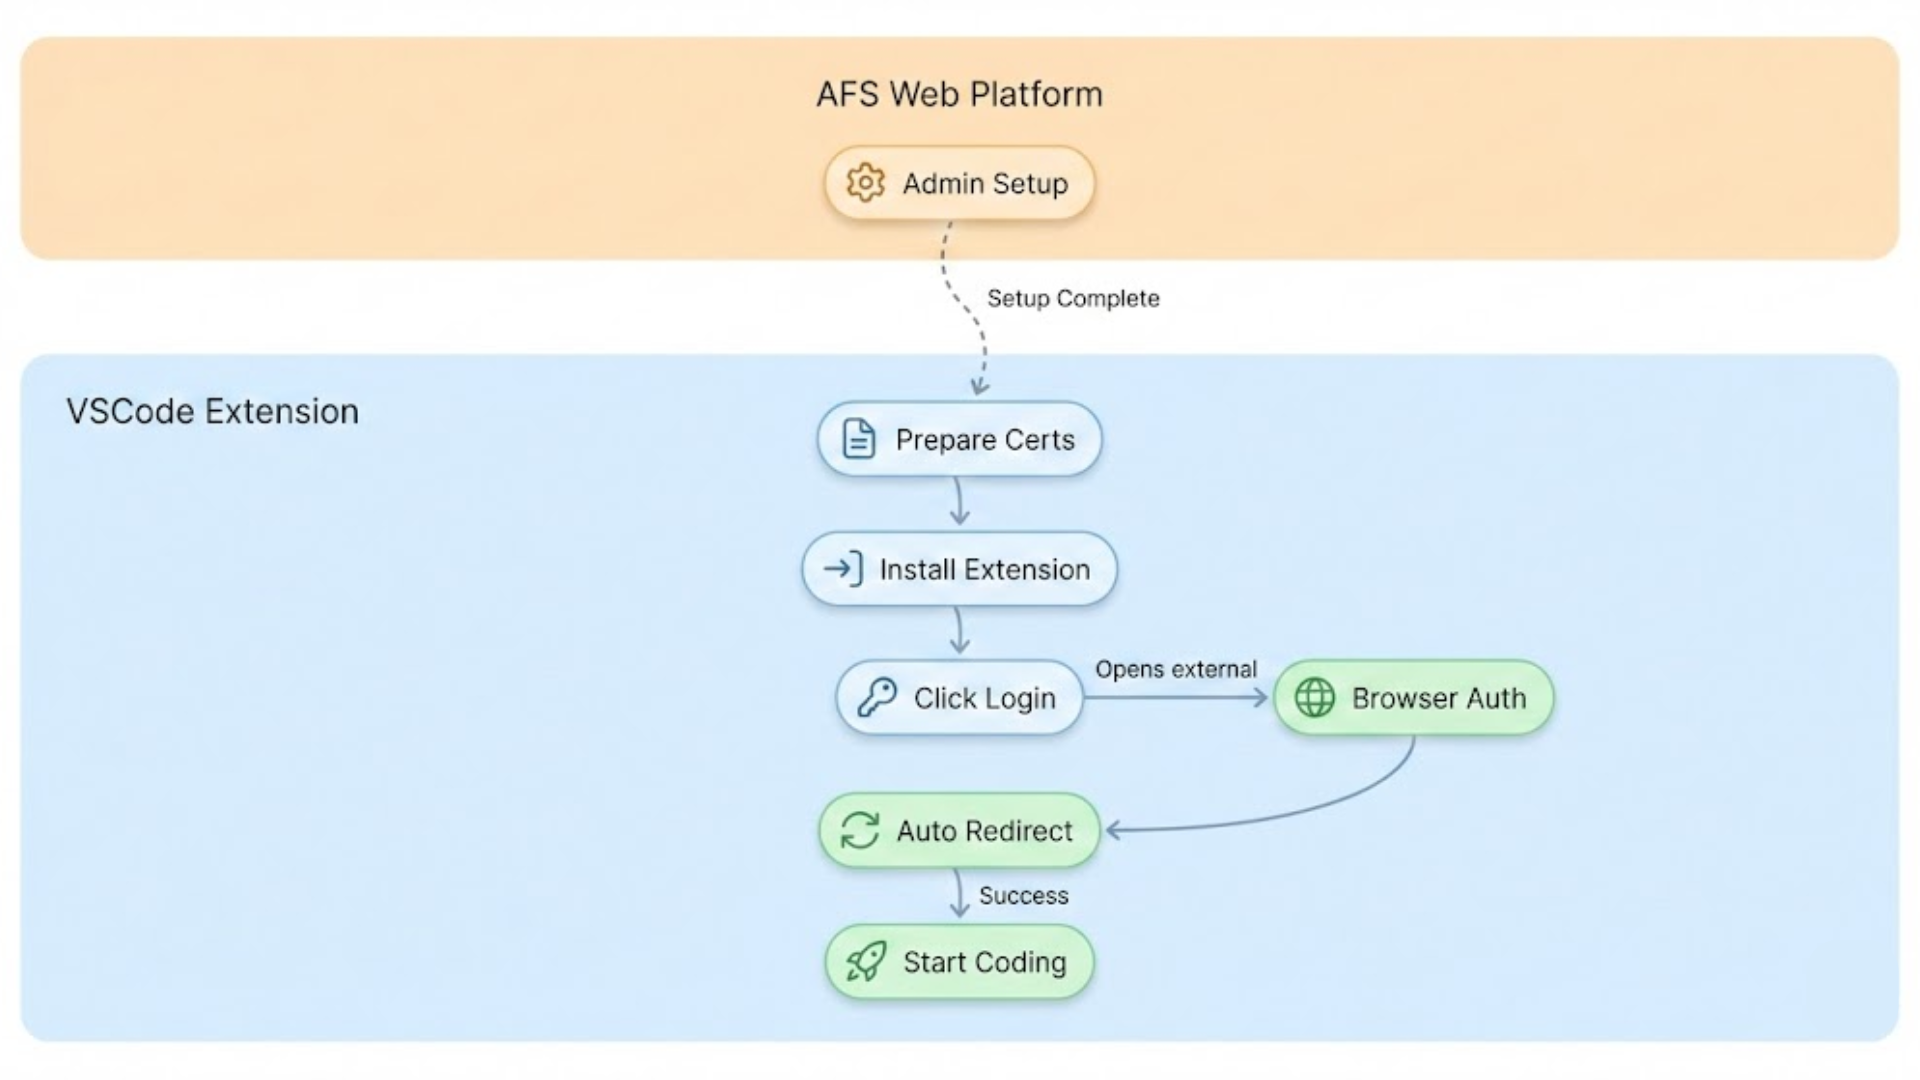 In short:
- Project Administrator: Sets up the project on the Web Platform.
- All Users: Install the VSCode extension and log in to authenticate. The extension will automatically configure your access to begin using the tool.
3. Setup Guide
Please follow the steps below to complete the setup. Skip this part and go to 3.2 VSCode Extension Installation if you are a Project User.
3.1. Web Platform Setup (Project Administrator ONLY)
Project administrators set up their project on the MyCoder web platform by configuring AI models and managing team member permissions.
3.1.1: Gain Access
- Email system administrators to request account access and explain your use case for AFS MyCoder
- Wait for account approval before proceeding
3.1.2: Access Platform Management
You can access two different versions of the AFS MyCoder website interface depending on your internet connection. Navigate to whichever one fits your setup from the table below:
| Internet Access | AFS MyCoder Name |
|---|---|
| Internal/External | MyCoder on TWAI |
| Internal ONLY | MyCoder on ASUS |
- Login with your approved email.
- Click the account information icon and click "Project Management" from the dropdown.
- Note:
- It is better to access the
MyCoder on ASUSif you are using an internal network. - In the
MyCoder on ASUSenvironment, if you have certification issues, you can reference 3.3.3: Server Configuration Steps.
- It is better to access the

3.1.3: Configure Models
- Select the three dots on the right side of the project and then click "Model" from the dropdown.
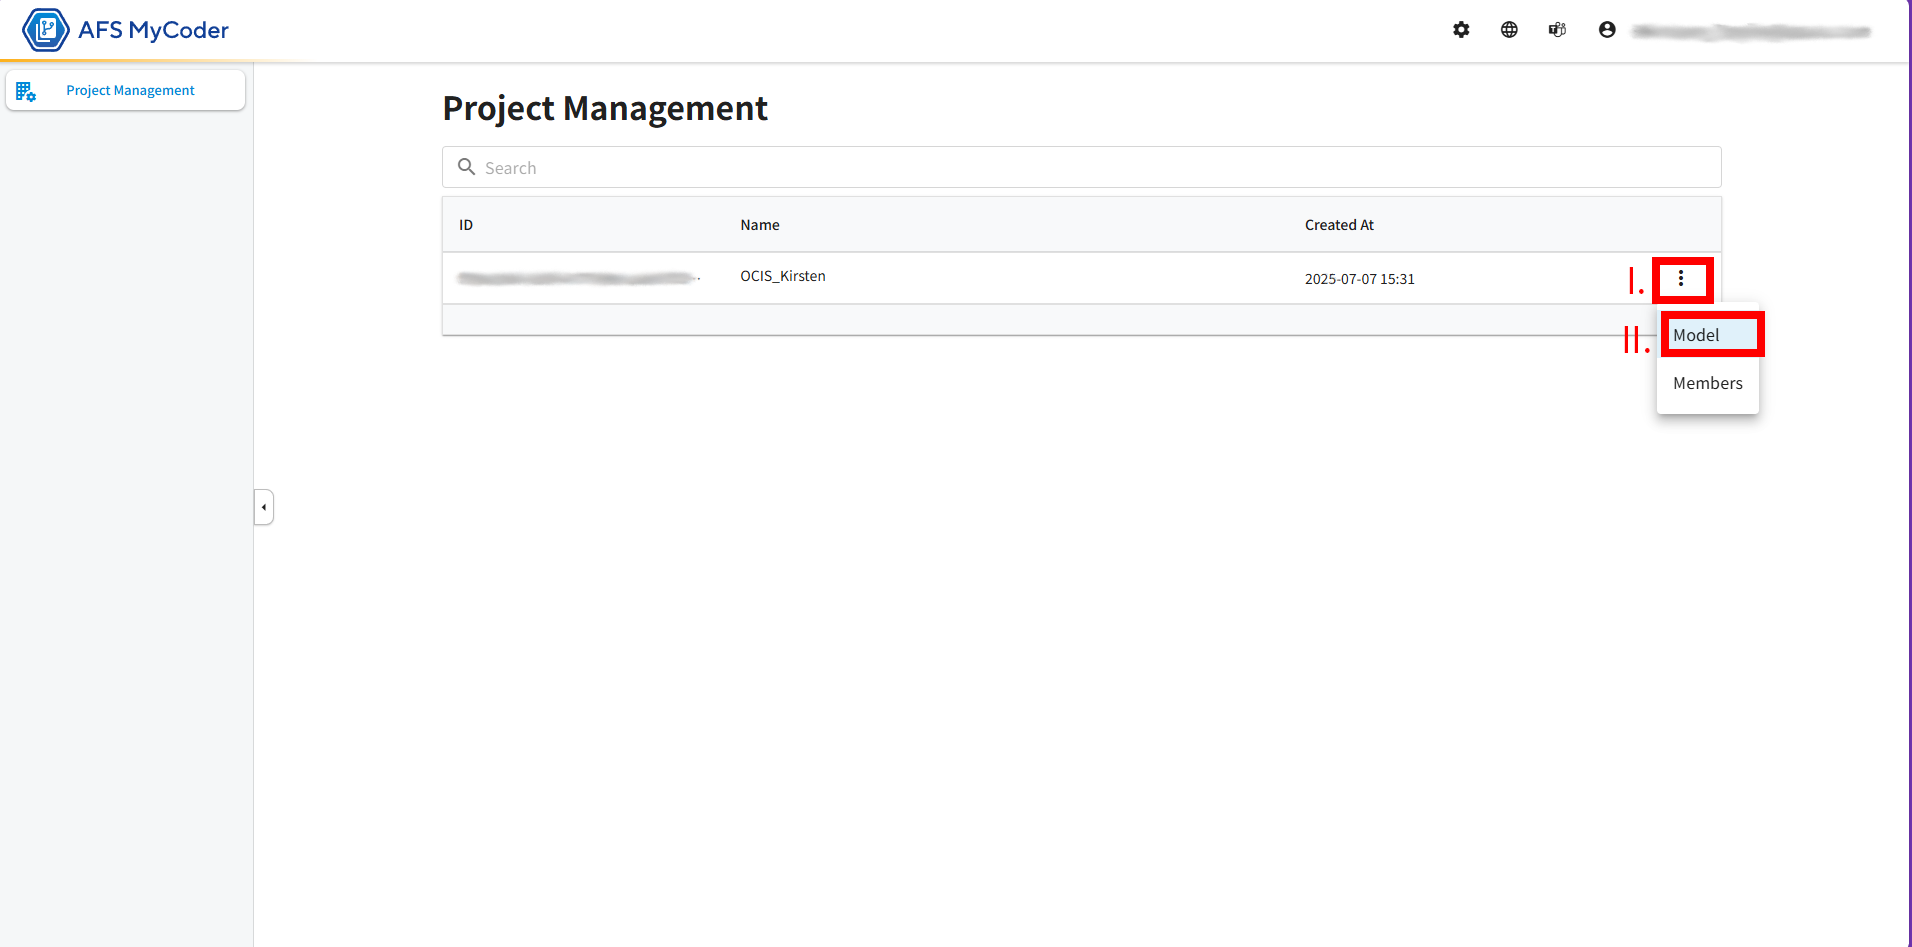
- You can select which Models you want to use by clicking on "Select Model" then using the checkboxes to select.
- Click "Ok"
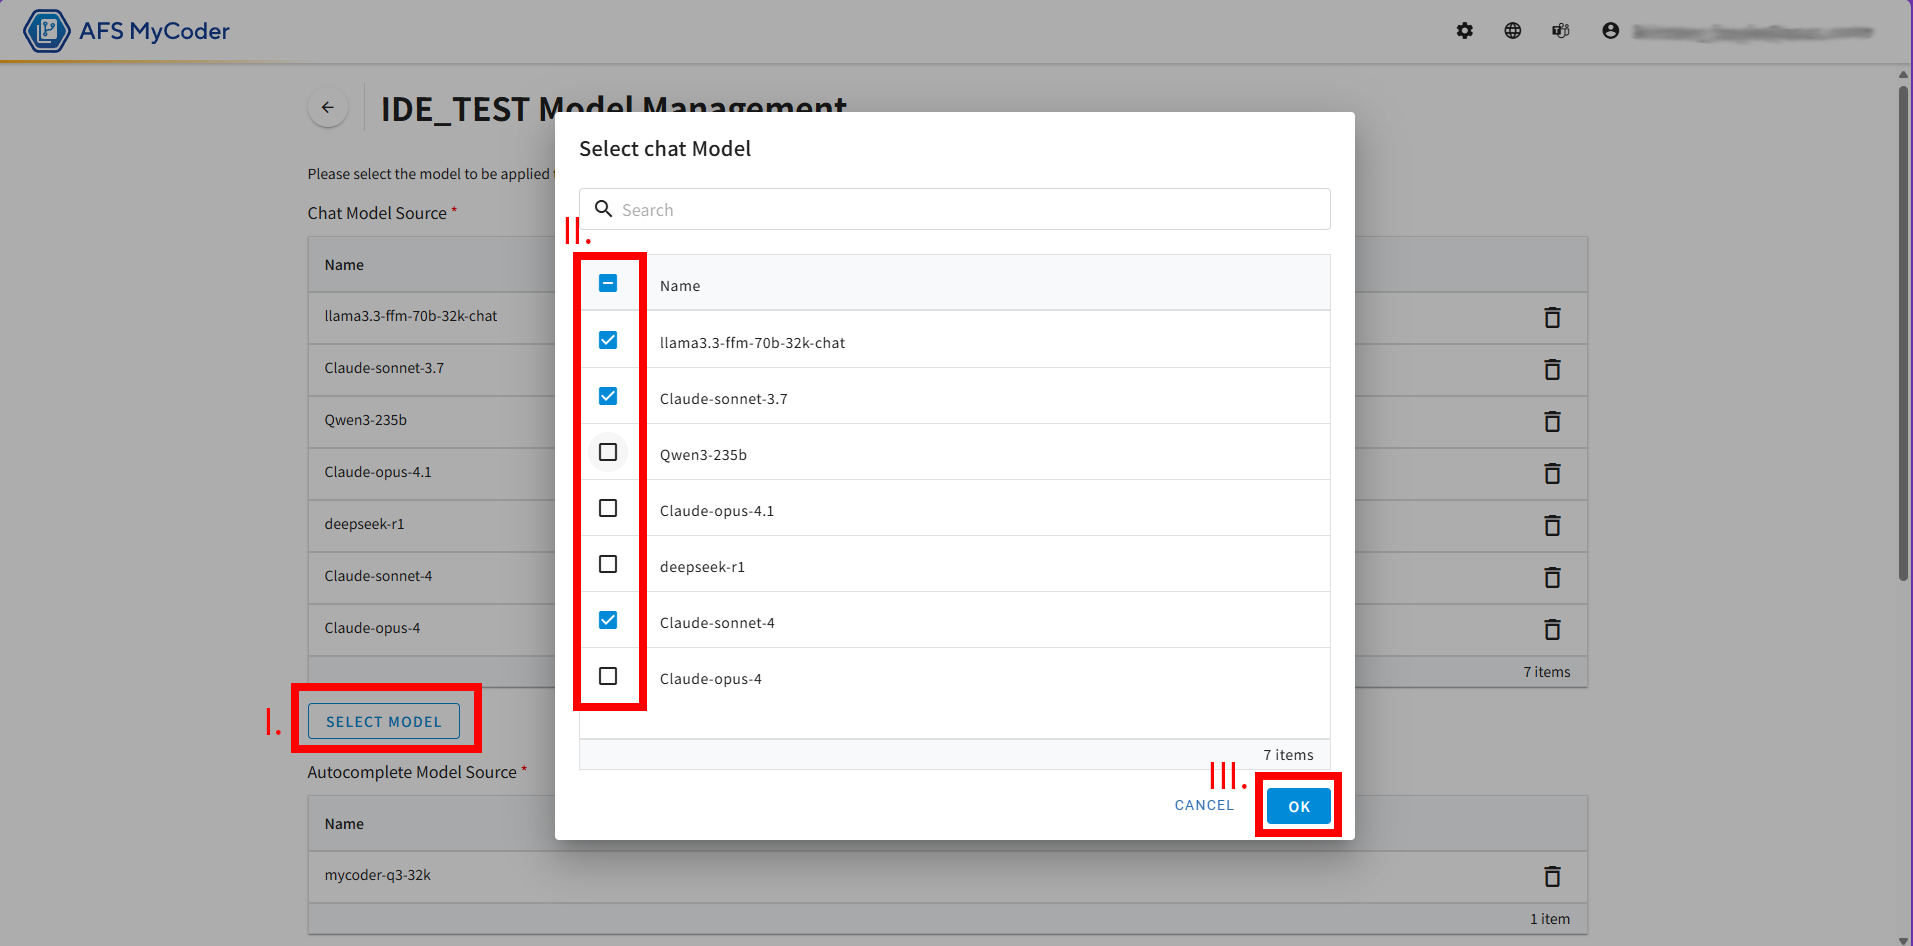
- Click "Confirm" to save.
3.1.4:
- Return to the project management page.
- Click three dots next to the ID and select "Members" from the dropdown.
- Click "ADD MEMBERS".
- Enter each of the member's email in your project and click "OK".
- After setup is complete, project administrators should proceed to 3.2 VSCode Extension Installation to install and configure their own development environment.
3.2. VSCode Extension Installation (All Users)
3.2.1: Install the Extension
- Open VS Code
- Open the Extensions Marketplace (or search online):
- Option A: In VS Code, click the Extensions icon in the sidebar (or press
Ctrl+Shift+X/Cmd+Shift+X) - Option B: Visit AFS MyCoder in VS Code Marketplace
- Option A: In VS Code, click the Extensions icon in the sidebar (or press
- Search for "AFS MyCoder" (if using Option A)
- Click "Install"

After installation completes, proceed to 3.3: Choose Your Server Environment.
3.3. Choose Your Server Environment (All Users)
AFS MyCoder provides two server environments with different authentication methods. After installing the extension, a default .env file is automatically created in your .afsmycoder directory to configure your server environment.
3.3.1: Server Options
AFS MyCoder provides two servers:
MIS Server (Production)
- For: ASUS employees with intranet access and ASUS accounts
- Authentication: Automatic LDAP sync with ASUS account (same as OA login)
- URL: https://afs-mycoder.asus.com
- Configuration:
DOMAIN=production - ⚠️ Requires: Certificate file setup
TWAI Server
- For: Users without ASUS intranet access or ASUS account
- Authentication: Requires separate account from AFS MyCoder admin
- URL: https://afs-mycoder.twcc.ai
- Configuration:
DOMAIN=twai
3.3.2: Environment Configuration
When you install the VSCode extension, a .env file is automatically created with default settings.
Default .env file location:
- Windows:
C:\Users\{YourUsername}\.afsmycoder\.env - macOS/Linux:
~/.afsmycoder/.env
Default configuration:
# AFS MyCoder Environment Configuration
# This file is in your ~/.afsmycoder directory and configures your environment

DOMAIN=production
3.3.3: Server Configuration Steps
- MIS Server (Default)
- TWAI Server
For ASUS employees - Certificate Setup:
Complete this setup AFTER installing the VSCode extension.
Step 1: Verify Environment Configuration
- Locate the
.envfile in your.afsmycoderdirectory:- Windows:
C:\Users\{YourUsername}\.afsmycoder\.env - macOS/Linux:
~/.afsmycoder/.env
- Windows:
- Open the
.envfile and verify it contains:DOMAIN=production - If you need to change it, update the
DOMAINvalue and save the file
Step 2: Install Certificate
- Request the certificate file from the AFS MyCoder admin
- Save the certificate file to the
.afsmycoderdirectory:- Windows:
C:\Users\{YourUsername}\.afsmycoder\mycoder-mis-rootCA.crt - macOS/Linux:
~/.afsmycoder/mycoder-mis-rootCA.crt
- Windows:
- Ensure the file is named exactly:
mycoder-mis-rootCA.crt - Restart VS Code to apply the changes
After setting up the certificate, proceed to 3.4: Login and Authentication.
For external users - Environment Configuration:
Complete this setup AFTER installing the VSCode extension.
Step 1: Update Environment Configuration
- Locate the
.envfile in your.afsmycoderdirectory:- Windows:
C:\Users\{YourUsername}\.afsmycoder\.env - macOS/Linux:
~/.afsmycoder/.env
- Windows:
- Open the
.envfile in a text editor - Change the
DOMAINvalue fromproductiontotwai:DOMAIN=twai - Save the file
- Restart VS Code to apply the changes
After updating the .env file, proceed to 3.4: Login and Authentication.
3.4. Login and Authentication (All Users)
Now that the extension is installed, you'll authenticate with your AFS MyCoder account:
- MIS Server (Default)
- TWAI Server
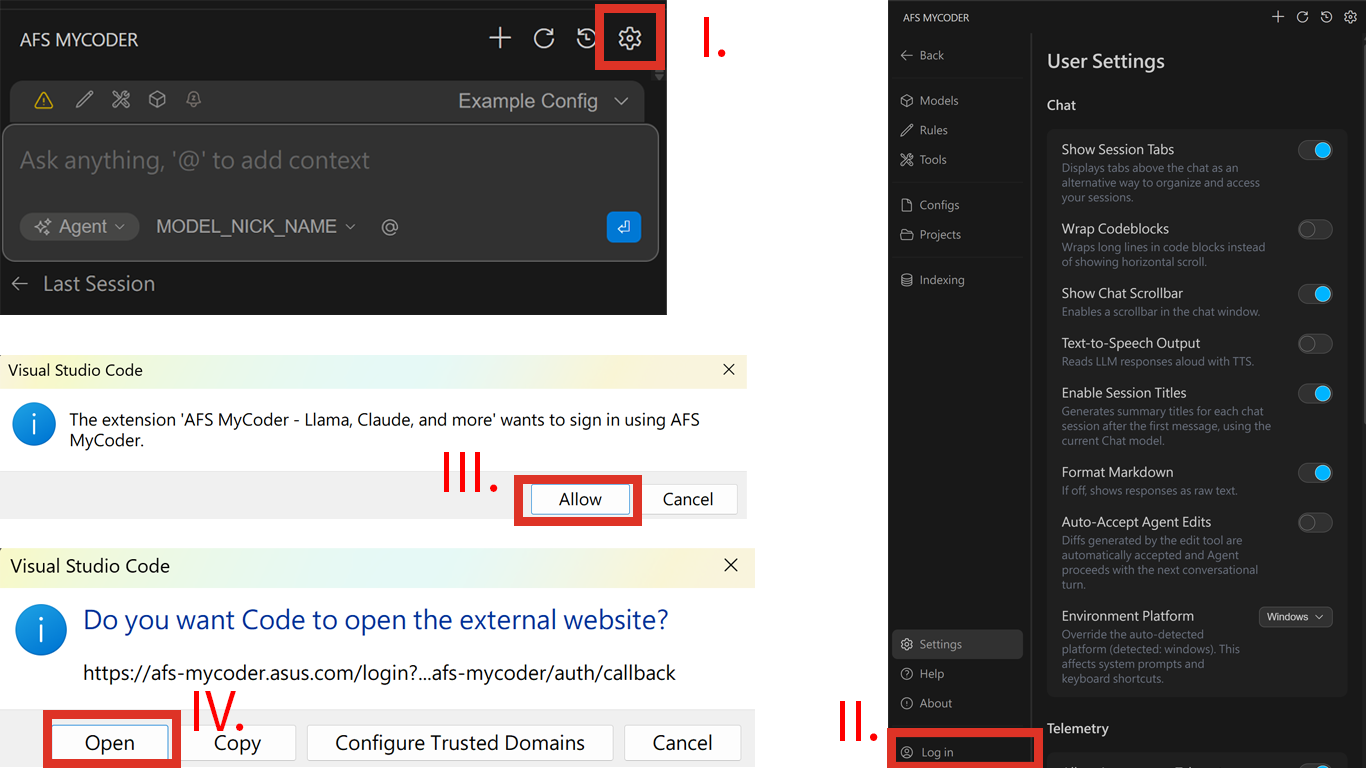
MIS Server Login (ASUS Employees):
- Click the AFS MyCoder icon in the VS Code sidebar
- In the AFS MyCoder panel, click "Open Settings"
- Click the "Log in" icon/button
- VS Code will prompt you to open the login page in your web browser
- Your browser will open to:
https://afs-mycoder.asus.com - Enter your ASUS account credentials (same as OA login)
- After successful authentication, the page will automatically redirect back to VS Code
- You should now see your account status displayed in the AFS MyCoder extension panel
Once you see your account information in the extension panel, you're successfully logged in!
If the login process fails or you don't see your account information:
- Certificate Issues:
- Verify the certificate file is in the correct location:
~/.afsmycoder/mycoder-mis-rootCA.crt(macOS/Linux) orC:\Users\{YourUsername}\.afsmycoder\mycoder-mis-rootCA.crt(Windows) - Ensure the certificate filename is exactly
mycoder-mis-rootCA.crt - Restart VS Code after placing the certificate file
- Verify the certificate file is in the correct location:
- Check that you're on the ASUS intranet
- Try restarting VS Code
- Check your network connection
- Check the browser console for error messages during login
TWAI Server Login (External Users):
- Click the AFS MyCoder icon in the VS Code sidebar
- In the AFS MyCoder panel, click "Open Settings"
- Click the "Log in" icon/button
- VS Code will prompt you to open the login page in your web browser
- Your browser will open to:
https://afs-mycoder.twcc.ai - Enter the credentials provided by the AFS MyCoder admin
- After successful authentication, the page will automatically redirect back to VS Code
- You should now see your account status displayed in the AFS MyCoder extension panel
Once you see your account information in the extension panel, you're successfully logged in!
If the login process fails or you don't see your account information:
- Environment Configuration Issues:
- Verify the
.envfile exists in:~/.afsmycoder/.env(macOS/Linux) orC:\Users\{YourUsername}\.afsmycoder\.env(Windows) - Open the
.envfile and confirm it contains:DOMAIN=twai - Restart VS Code after modifying the
.envfile
- Verify the
- Verify you're using the correct credentials provided by the admin
- Try restarting VS Code
- Check your network connection
- Check the browser console for error messages during login
3.4.1: Verify Configuration
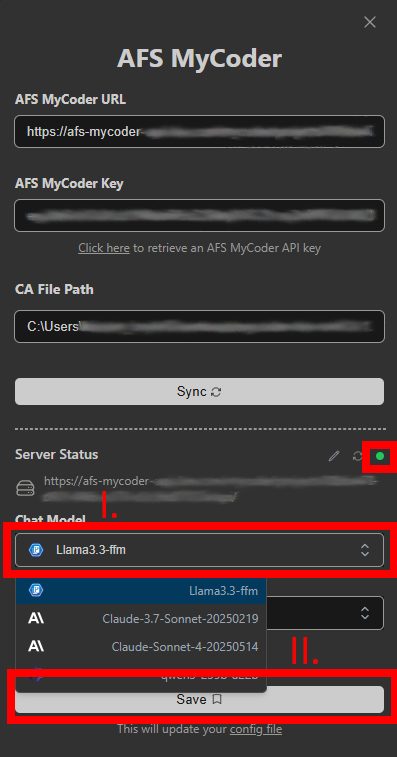
After successful login, verify your setup is working correctly:
- In VS Code, click the AFS MyCoder icon in the sidebar (if not already open)
- You should see:
- ✅ Your account information displayed at the top
- ✅ Server status showing "Connected" with a green indicator
- ✅ Available chat models in the dropdown menu
- Select your preferred chat model from the dropdown
- Click "Save" if you made any changes
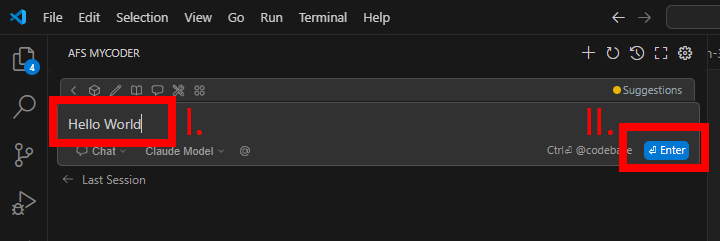
3.4.2: Test Installation
- Type "Hello World" in the chat box.
- Press Enter.
- Verify you receive an AI response.
3.5. Additional Configuration (Optional)
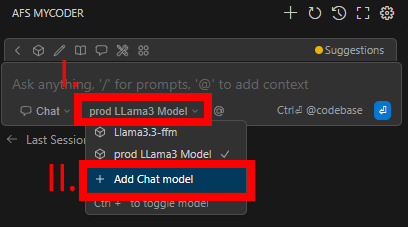
3.5.1: Configuring More Chat Models
- Click "Chat Model" dropdown and click "Add Chat model".
- You can add more Chat Models depending on your provider.
- Don't forget to click "Save" when exiting.
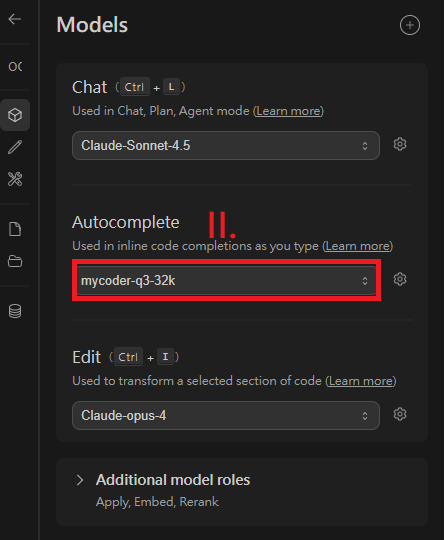
3.5.2: Configuring AutoComplete Models
This chat model can help you with providing inline code suggestions as you type. Configure your AutoComplete model by completing the following steps.
- Click the "models" button (cube shape on top of the chat box).
- Click current seleted model in Autocomplete section.
- You can add more AutoComplete Models depending on your provider.

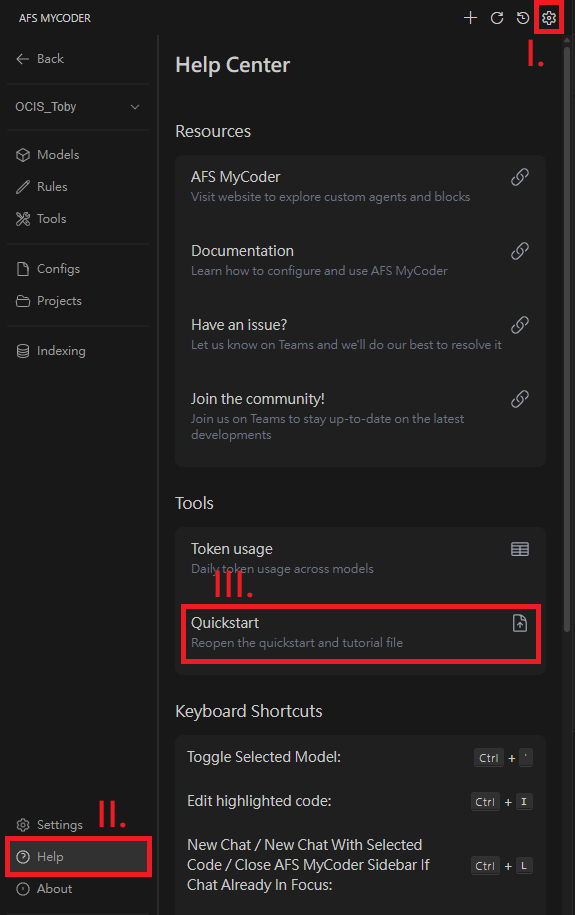
3.5.3: After Setup Tutorial
To further explore the functions of AFS MyCoder, you can navigate to the tutorial file which will guide you through the four main functions of AFS MyCoder: AutoComplete, Edit, Chat, and Agent.
- Click the "settings icon" in the top right of the AFS MyCoder extension box.
- Click "Help".
- Click "Quickstart".
- This will bring up the
mycoder_tutorial.pyin the right panel as well as the AFS MyCoder starting page. - You can exit the starting page and begin the tutorial on the right.
3.6. Config File Setup (Advanced Users)
3.6.1: What is config.yaml?
config.yaml is a text file that controls how AFS MyCoder works behind the scenes. It is considered the "settings file" where all your preferences are stored. Users can optionally customize MyCoder's functionality by editing the config.yaml file to add different AI models and context providers for enhanced features.
Important to understand:
- Created automatically the first time you use AFS MyCoder.
- Updates automatically when you make changes through the UI.
- Changes in the file apply instantly after saving.
- Can be reset by deleting the file (AFS MyCoder will recreate the default version).
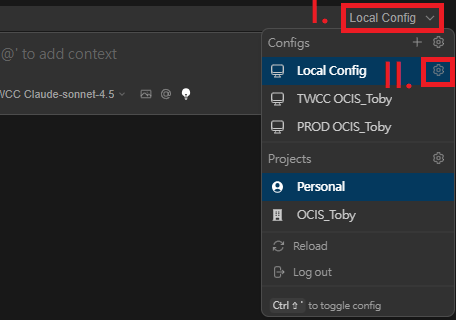
3.6.2: Locate config.yaml file.
You can modify config.yaml file by:
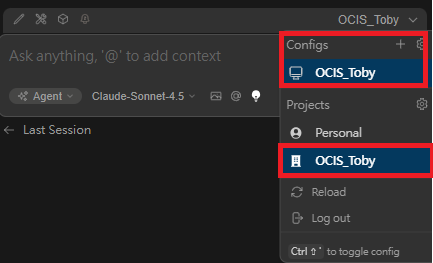
- Open the MyCoder sidebar (press Cmd/Ctrl + L in VS Code).
- Click the Current Config dropdown at the top right of the sidebar
- Click the settings gear icon in the Configs section.
- This opens the corresponding config.yaml in the editor.
3.6.3: How UI Changes Affect config.yaml
When you make changes in the AFS MyCoder interface:
- Adding a new model → Automatically adds model settings to config.yaml.
- Changing API keys → Updates values in config.yaml.
Example: If you click "Add Chat Model" in the UI and fill in details, this is what happens in config.yaml:
models:
  - name: { Your Model Name }
    provider: afsmycoder
    model: { yourModel }
    apiKey: { your-API-key }
    apiBase: { your-API-url }
3.6.4: Models Customization
Learn more about model providers: Model Providers Documentation
3.6.5: Context Providers Customization
Context providers add information to your prompts, giving your LLM additional context like code snippets, documentation, search results, and more. Your config includes many default context providers, but you can add more.
For example:
context:
  # Default providers (already in your config)
  - provider: afscode
  - provider: afscommit
  - provider: docs
  - provider: currentFile
  - provider: codebase
  # ... and more

  # You can add additional custom providers
  - provider: { custom_provider }
    params:
      customParam: { value }

  # External integrations
  - provider: database
    params:
      connections:
        - name: { your_database }
          connection_type: postgresql
          # ... connection details
Learn more about context providers: Context Providers Documentation
3.6.6: How to Edit Safely
- Start with UI-based configuration for models.
- Use direct editing for advanced context provider customization.
- Refer to the official documentation for detailed parameters.
- Keep your API keys and tokens secure.
- After editing the config.yaml file, make sure to Ctrl + S when saving.
Need more help with using MyCoder? Refer to the MyCoder Documentation for detailed feature explanations.
4. How to Identify Issues
Before reporting a new issue, it's important to understand what is considered an issue and check if it has already been reported.
4.1 Check Existing Issues First
- Navigate to the Issues tab in the sidebar of Gitlab.
- Browse through existing issues to see if your problem has already been reported.
- You can search for keywords related to your issue.
- If you find a similar issue, consider adding your information in the form of a comment to that existing report at the bottom instead of creating a duplicate.

4.2 Types of Issues You Can Report
Problems ![]()
- Something is broken or not working as expected.
- Features that used to work but now don't.
- Error messages or crashes.
- These require fixing and have priority.
Suggestions ![]()
- Ideas for new features or improvements.
- Better ways to implement existing functionality.
- User experience enhancements.
- These are evaluated for future development.
Cases ![]()
- When you're unsure if something is actually a problem.
- Questions about expected behavior.
- Need clarification on how something should work.
- These help us understand user confusion and improve documentation.
4.3 Before Reporting an Issue
Basic Testing Checklist:
- Restart VS Code and try again.
- Check if the issue occurs in a new/clean workspace.
- Verify your MyCoder extension is up to date (You can do this by searching for AFS MyCoder in the Extension Marketplace).
- Test with other projects to see if it's project-specific.
Still Not Sure?
- Consult the MyCoder Documentation for expected behavior.
- When in doubt, it's better to report it as a "Problem" rather than not report it at all.
5. Creating an Issue Report
Once you've confirmed that your issue hasn't already been reported, follow these steps to create a comprehensive issue report.
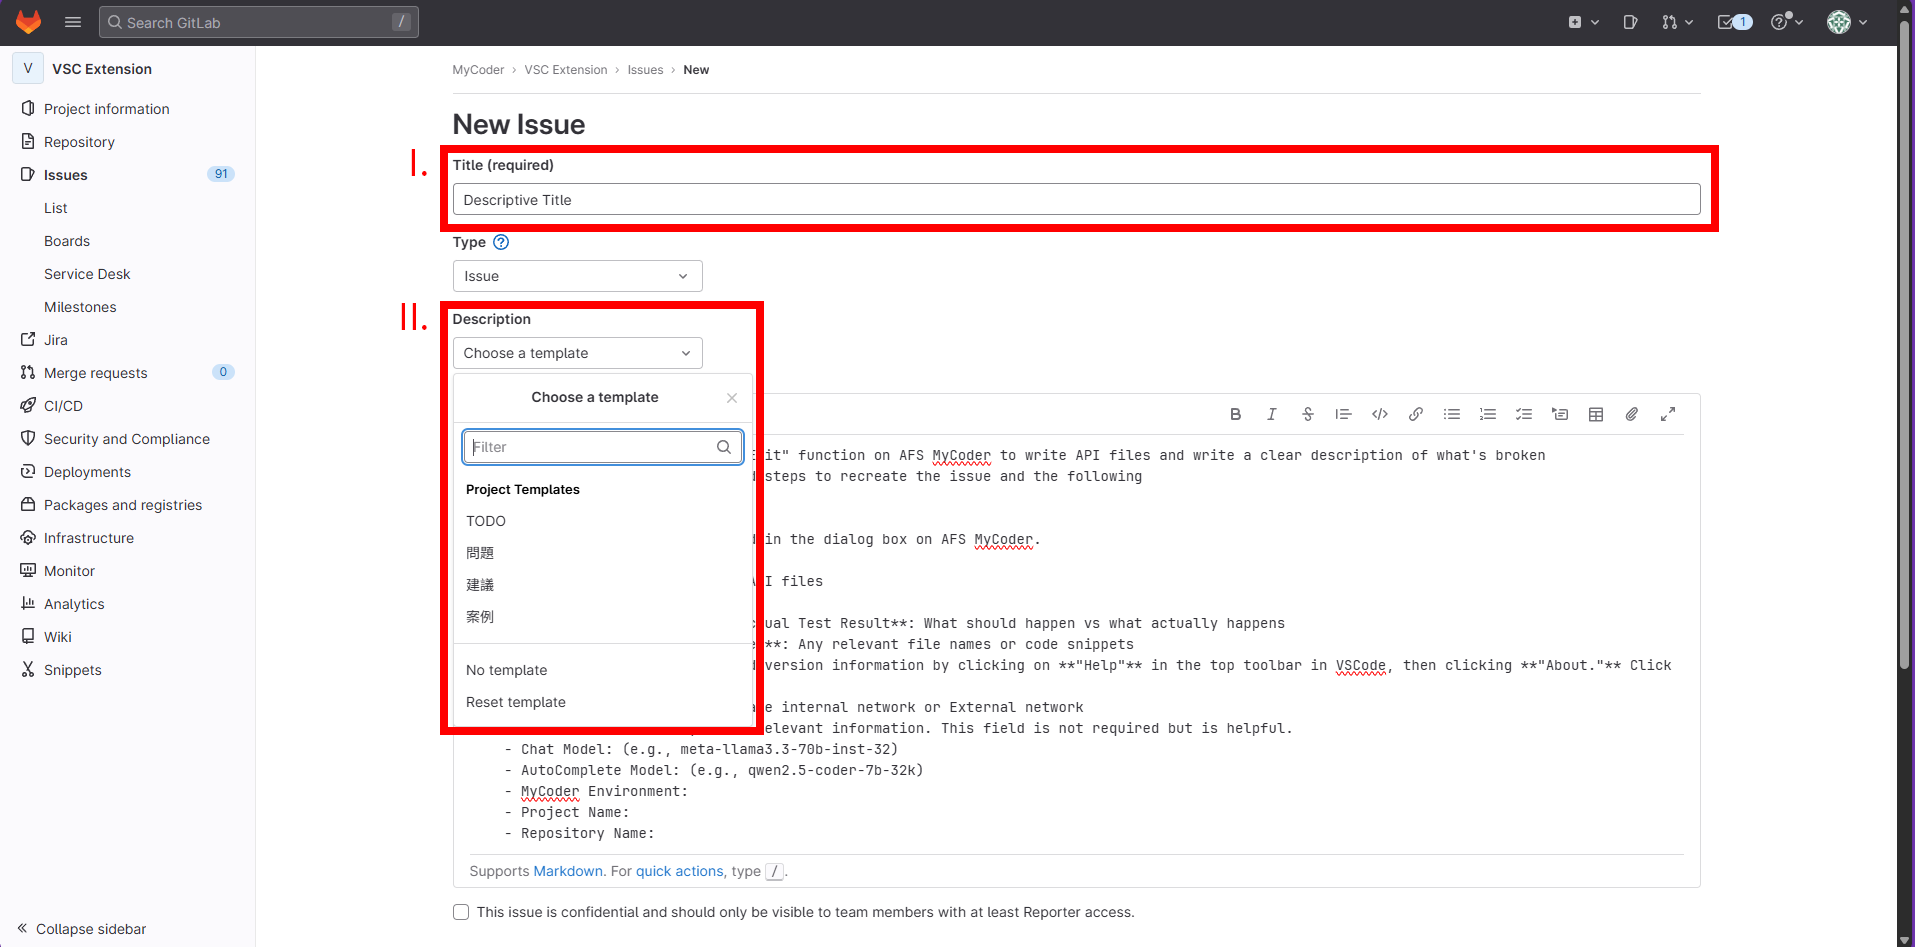
5.1: Start a New Issue
- Navigate to the Issues tab in the sidebar of GitLab.
- Click the "New Issue" button in the top right section of the screen.
- Create a descriptive title.
- Click the dropdown under Description to select the appropriate template:
- Problems - for bugs and broken functionality
- Suggestions - for feature requests and improvements
- Cases - for questions and unclear situations
5.2: Fill Out the Issue Template
Required Information to Include:
-
Case Description: A clear description of what's broken and the use of the "Edit" function on AFS MyCoder to write API files.
-
Steps to Reproduce: Numbered steps to recreate the issue and the following
- Select the section of code
- Press Ctrl + I
- Enter the following command in the dialog box on AFS MyCoder.
Please help me generate REST API files -
Expected Test Result Versus Actual Test Result: What should happen? vs What actually happens?
-
Related Code Files and Pictures: Any relevant file names or code snippets.
-
VSCode Version: You can find version information by clicking on "Help" in the top toolbar in VSCode, then clicking "About." Click "Copy" and add it to the Issue Report.
-
Network Environment: Corporate internal network or External network.
-
Additional Notes: Any other relevant information. This field is not required but is helpful.
- Chat Model: (e.g., meta-llama3.3-70b-inst-32)
- Autocomplete Model: (e.g., qwen2.5-coder-7b-32k)
- MyCoder Environment:
- Project Name:
- Repository Name:
5.3: Submit Your Issue
- Review your issue for completeness and clarity.
- Click "Create Issue" to submit.
5.4: Tips for Better Issue Reports
- Be specific - vague descriptions are hard to act on.
- Include context - what were you trying to accomplish?
- One issue per report - don't combine multiple problems.
- Use clear language - avoid jargon when possible.
- Follow up if developers ask for more information.
6. Contact Information
- If you need additional help beyond what's covered in this guide, you can contact system administrators.